A recent email, edited.
Hi Doug
I live in Spain, retired, no help here. My Unimat-3 motor tripped the house breaker.
Metering the power plug showed a short on Hi and open on Lo. Looking in side under the plastic cover I found the 5- wire capacitor burst.. Being a little familiar with electrics and viewing your ' Motor Tips' I am hoping that is the cause of short. Could you confirm my diagnosis. Regards Rick
Rick,
Sounds like a familiar story.
Yes Capacitor is bad, one side open the other shorted to ground or motor case.
You might try this, remove capacitor and wire as though it was never there . Green to case.
Motor should run if it is still OK. As for the brush caps they pry off.
Hope this helps, Doug
Thanks for your prompt reply, Doug
Cut Cap out. Leaving wires long. Joined Blue to Blue and Black to Black. Motor runs fine, no TV interference. U are correct though. This puppy is not for people with little or no knowledge of motors. Full service later.
Thanks again.
Rick ( in Spain )
Rick,
Thanks for the note, I'll put it up on website when I update.
Only difference you might notice is a bit of chopping noise when in Lo speed ( the big X-Y cap would help smooth out the choppy half cycle from the diode ).
As for TV noise there are still small caps in place across the brushes to take care of that.
Cheers, Doug
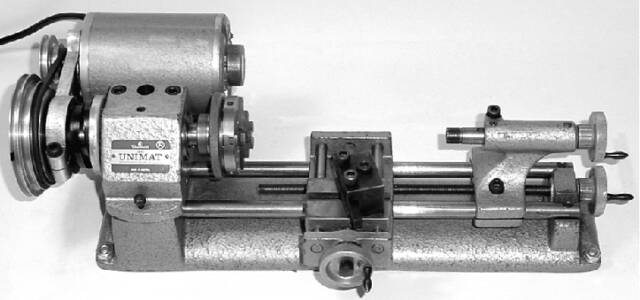
* UNIMAT MOTOR TIPS PAGE *
Very early Unimat DB with brushless induction motor
Pix credit, Tony Griffiths
 | ||||||
A new page to consolidate the growing volume of motor information
Motor Section Moved from Tech Tips Page
I have had a lot of emails requesting info on servicing of motors. This should help.
This section updated November 2010
Unimat Motors, Premature Failure?
Before you condemn your faulty motor to the scrap heap. Perhaps you will find a bit of saving verbiage below...
I have received quite a few emails regarding drive motor failures. Replacing the motor if you can find one, can be as costly as a basic unit.
Let me just pass this information along in the hope of saving a Unimat user the trials & expense of motor replacement.
All DB/SL & Unimat-3 motors have an intermittent duty or " duty cycle of 80%. ( the 80% duty cycle was gleaned from the Unimat-3 manual). If the motor becomes hot to the touch, 130 deg. to 140 deg., let cool...
Which means after being used for 8 minutes, it must be switched off for 2 minutes!
This is especially important when chucking up harder materials like steel.
Keep in mind the internal heat generated by the motor is only dissipated thru the metal case of
the motor, there is no cooling fan. Excessive internal heat will lead to premature bearing & motor winding failure.
The only exception here is the U-100 motor.
This is the gray plastic cased motor with the orange slide switch. It was supplied from approx.
68' to 74'. This is the only Unimat motor that is internally fan cooled & continuously rated.
Also I agree with Steve Jaynes, that it is the best & probably most expensive motor Unimat
provided, judging that in the last years of production they went back to the metal case motors
& plastic handles.
Doug: ( an interesting e-mail )
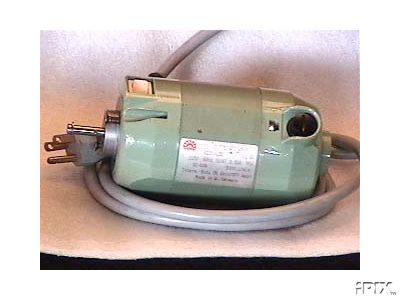
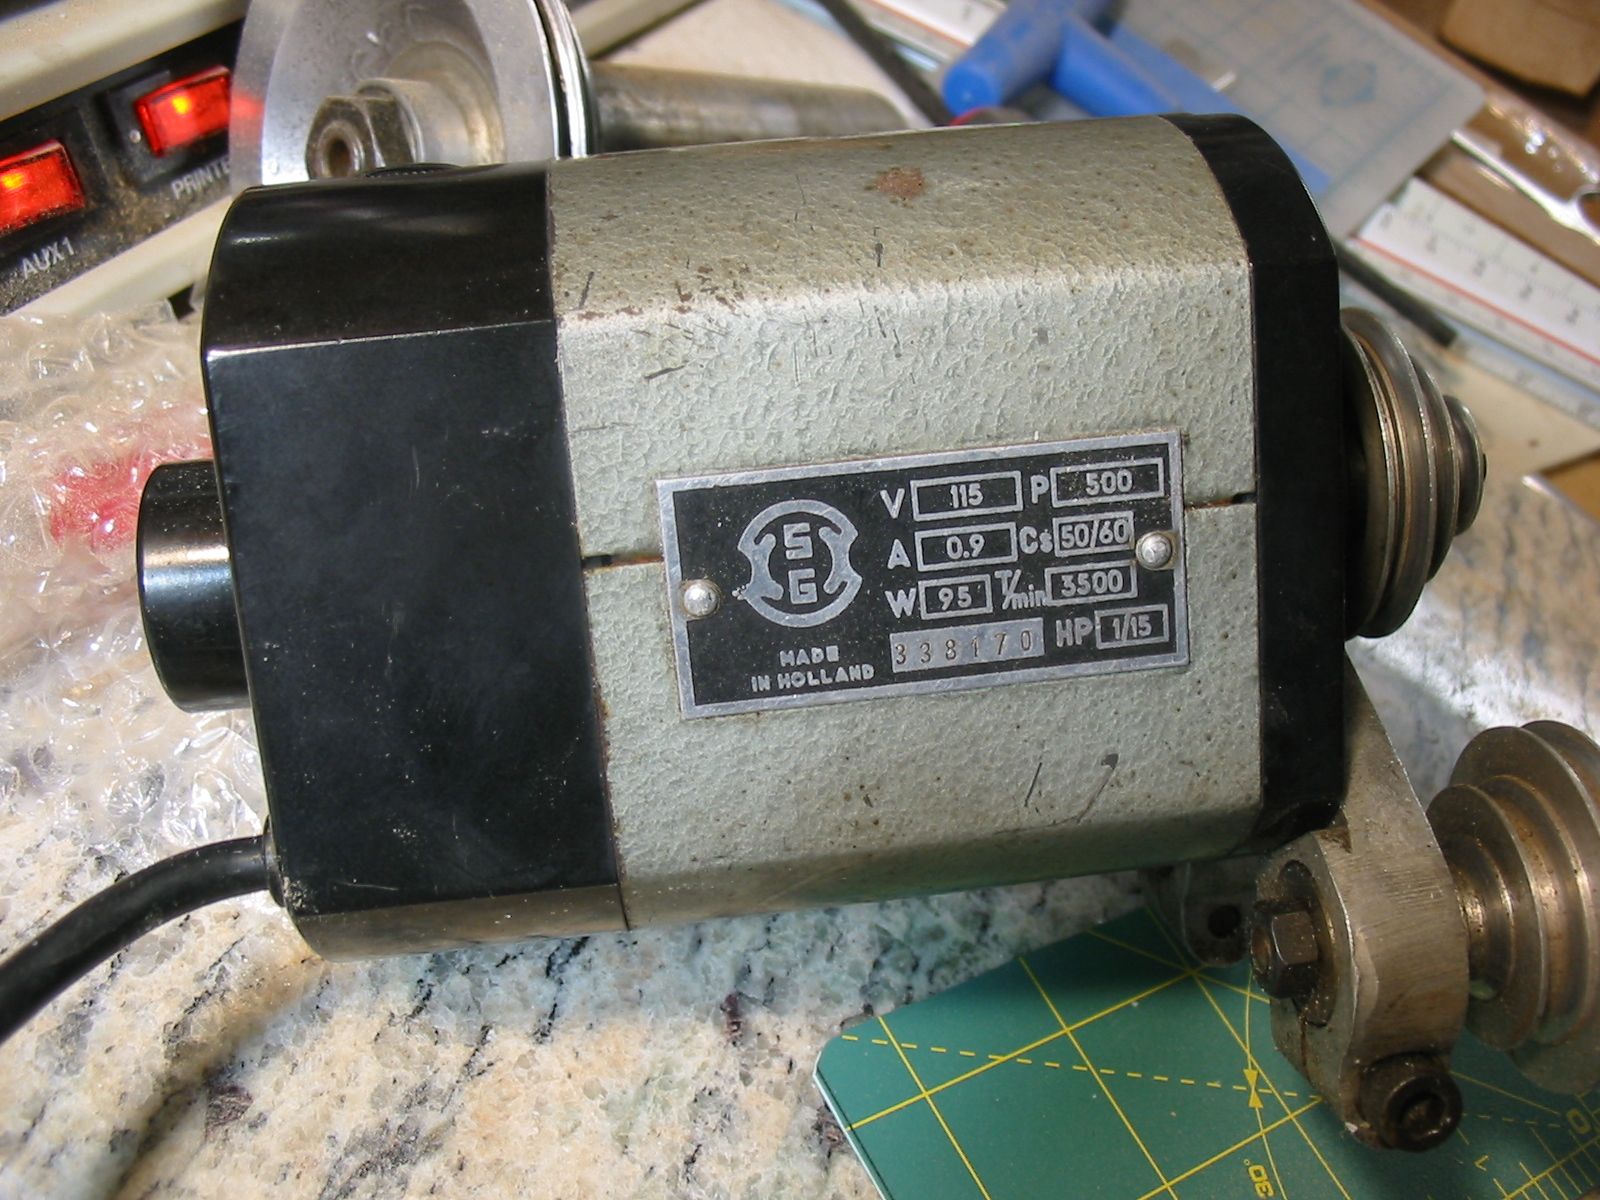
Here's some info for you, and a question. You state in your Tech Tips section (thanks for that, as well as your whole web site!) that the U-100 motor was the only one that was fan cooled. My Unimat, a greenish hammertone DB200 model, of which I am the original purchaser ... probably bought new somewhere between late `59 and early `60 as best I remember ... is fan cooled but is not the U-100. Instead it's a made in Holland motor, labeled Motern Eindhoven, 2800 RPM, 125 Watt unit. The addendum pages supplied with the manual are specific to the 2800 RPM motor speed. It has a really fat capacitor housing located under the motor, to which is affixed the data plate. The switch is on the line cord. Yes, it's fan cooled and pumps hot air out the screened openings in the rear, but it still gets HOT. When the motor reaches a temp where it's uncomfortable to touch I turn it off and let it cool. John Williams
John, Thank you for the info. Doug
Pix of a Motoren Eindhoven made in Holland. Dutch made induction motor with cooling fan from Very Early Unimat DB.
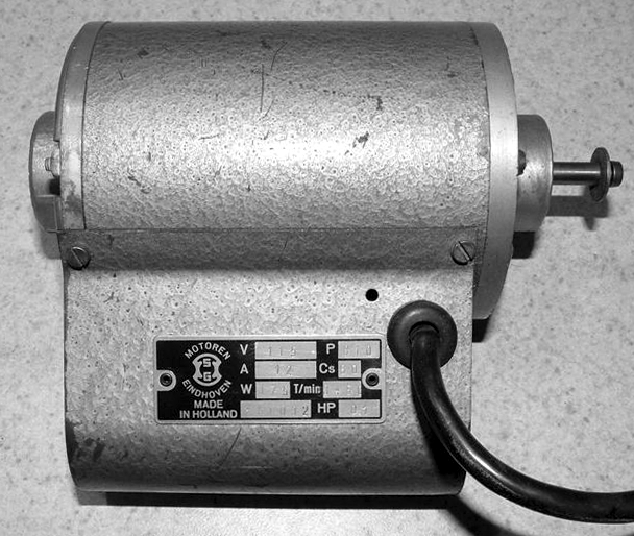
Pix credit , Tony Griffiths
Pix of Early Unimat DB with Black and Silver Dutch made motor. Motoren Eindhoven made in Holland
Pix credit , Steve Jaynes
Pix of an Early Unimat DB (early to mid 1950's) with another version of the Motoren Eindhoven made in Holland. Black Dutch made brush type motor.
This is a very nice original cast iron DB 200. Notice it has the machined "key" slot for spindle head alignment.
Base has cast-in chip pan
I like the look and feel of these early machines.
Pix credit , Brown Hawkins
For more early motor and machine info. See links below to sites by Steve Jaynes and Tony Griffiths.
More motor information
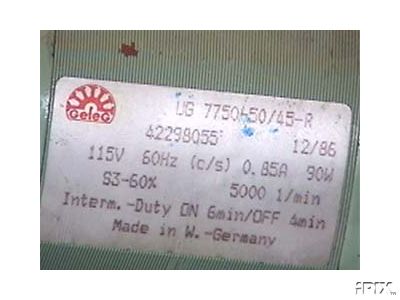
The Unimat DB/SL manual states that the the motor is continuously rated, they illustrated the U-90 motor, but later motors and the Unimat-3 manual clearly indicate a duty cycle rating. These motors are all of a basic similar design. Did Edelstaal/ Emco have an issue of replacements under warranty and added the duty cycle spec.?
Here are a couple of pix of the UG-7750 motor. With date code: 12 / 86 . A later replacement motor for the U-90. Clearly illustrated is the duty cycle rating. In this case 60% 6 min. on / 4 min. off
We can also note here that this is the same style of motor used on the Unimat-3. Difference being two speed switch and circuit for Unimat-3.
The U-90 , U-7750 and Unimat-3 motors have self aligning oilite or bronze bearings. I don't believe replacements were offered.
The U-100 motor has ball bearings, which are replaceable.
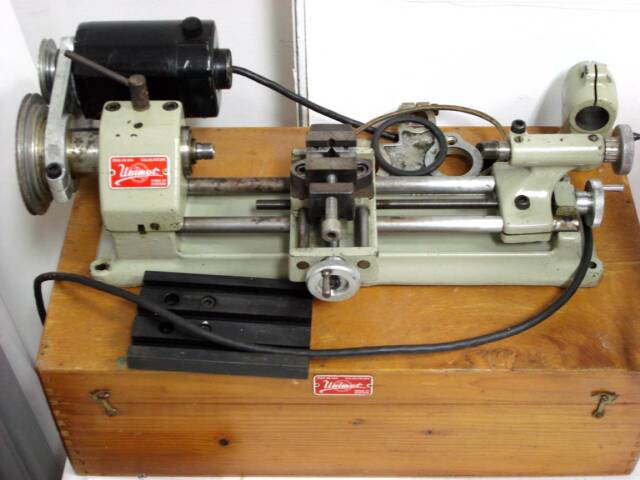
The Most Common Unimat DB/Sl Motors & Unimat-3 Motor
Note; There were several different Dutch motors on the very early DB 200's. They are documented on other sites.
Steve Jaynes, Unimat site: http://home1.gte.net/jaynes/lathes/Unimat-SLs/Unimat-motors.html
Tony Griffiths, Lathes site: http://www.lathes.co.uk/unimat/index.html
I am covering the most common motors here.
Servicing Motors
These motors are old. Do not hesitate to service them. It will be more costly to replace them later.
Before servicing motor disconnect from electrical power!!!
Note; Before disassembling any of these motors. You need to remove the pulley stop pin and clean up any burrs on shaft as not to damage bearings removing case from shaft. ( see above Tech Tip, Common screw sizes, for stop pin info. )
Take your time in disassembly, note how things go together. It will be easier in reassembly.
The carbon dust from the brushes can really load up inside of motor, arc-over and burning of commutator can cause intermittent problems. A good thorough cleaning is usually required.
If you do not feel comfortable working on motors , have a local motor shop service it.
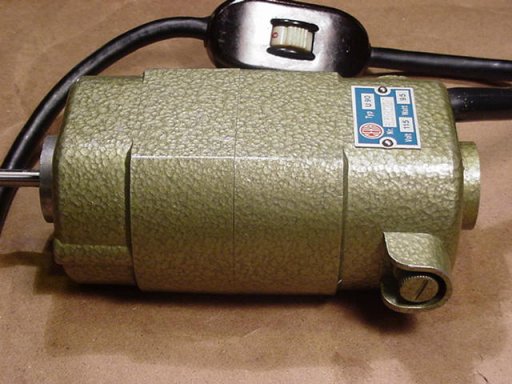
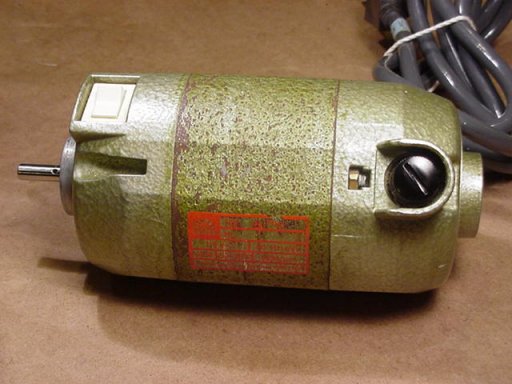
U-90 Motor. Probably the most widely used motor.
This is a well made motor with large oilite bearings.
To service; first unscrew brush caps, remove carbon brushes ( make note of orientation, must go back same way ), mark case where it splits ( must go back same way ), remove nuts front of motor ( 7mm nut, a cheap 9/32" x 1/4'' socket with the O.D. ground to fit, works ).
Split case, watch orientation of internal washers.
Again, solvent clean, dry.
While rotor is out , clean commutator with fine garnet paper, solvent clean and dry.
If you are not familiar with this procedure. Stop here. Seek help.
Clean, oil bearings with light oil then I lube shaft with Lubriplate (machinist lube, a light lithium / moly base grease ).
Put back together in reverse order.
U-7750 Motor. It was used after the U-90, and remerged in the last years of production. It was also sold as Emco's final replacement motor.
Again a well made motor with large oilite bearings.
To service; first unscrew brush caps, remove carbon brushes ( make note of orientation, must go back same way ), mark case where it splits ( must go back same way ), Unscrew bolts from front. Split case, watch orientation of internal washers.
This motor has wiring in front and rear of case, careful..
Again, solvent clean, dry.
While rotor is out , clean commutator with fine garnet paper, solvent clean and dry.
If you are not familiar with this procedure. Stop here. Seek help.
Clean, oil bearings with light oil then I lube shaft with Lubriplate (machinist lube, a light lithium / moly base grease ).
Put back together in reverse order.
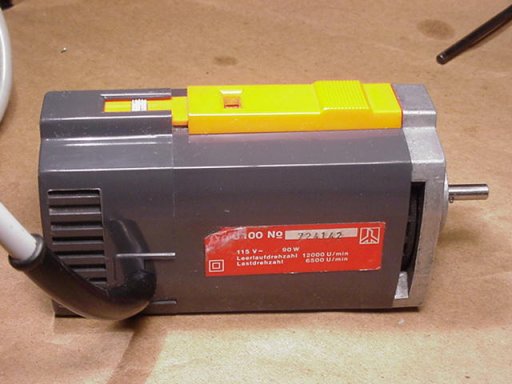
U-100 Motor. It came into use after the U-7750. But as mentioned above was not the final motor. The U-7750 came back in the final years of production.
A well made motor, probably their best ( most expensive ). Has internal cooling fan, rated for continuous duty and ball bearings.
Because of cooling fan,the inside can become quite dirty.
This motor is a little more complicated internally.
Remove back cover ( two screws ), first. Remove small push on terminals from brush holders ( tag / mark wires, capacitor may fall out, note placement). Pull out brush holders. Unscrew front screws, pull motor apart (there is a felt seal in front and spring washer in rear that may fall out ).
Again, solvent clean, dry.
While rotor is out , clean commutator with fine garnet paper, solvent clean and dry.
If you are not familiar with this procedure. Stop here. Seek help.
Clean ,repack bearings if you can, with medium bearing grease.
Put back together in reverse order.
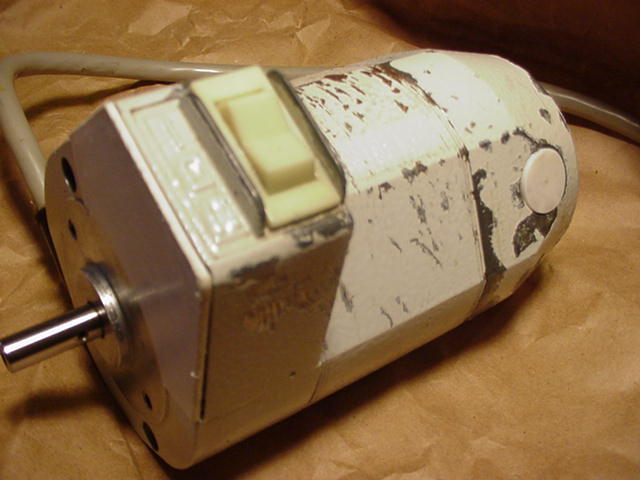
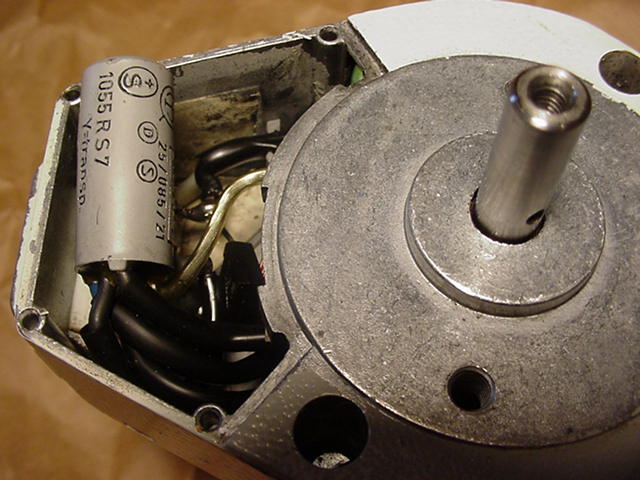
Capacitor Issues / Motor Runs Backwards
I have received many of emails about capacitor questions and even backward running motors. Emails from Unimat users have suggested that the rotation reversal has to do with motor capacitor failure.
This led me to find a technically definitive answer. Well it's all here. Technical discussion, diagrams and pictures. Starting with Art Bell's comment.
Here is a recent email I received from Art Bell (Yahoo Unimat Group moderator). This will shed some light ( actually a, spot light ) on capacitor function and motor runs backwards problem. Thanks, Art...
Hi Doug,
As a moderator of the Yahoo “Unimat” group we are often referring our members to your excellent advice and articles. I try to regularly review each site listed in our Links section to make sure the link still works and to see what has been added or changed. I noticed that you now have a “Motor Runs Backwards” heading. Over the years this subject has come up in our group discussions, and is always the result of a recent motor disassembly, with the usual advise from amateurs and experts running from reversing the power leads to reversing the brush leads to doing some of each or both. Some members merely took the motor apart, changed nothing (they thought) and it miraculously corrected itself. To try and resolve this once and for all, I disassembled my perfectly good U90 motor to see what might be a possibility. Index marked the case and the field coils to insure reassembly would go smoothly, learned little or nothing from what I seen internally and reassembled the motor again. It run reversed!! How could this be?? It turns out that while concentrating on positioning the internal leads to clear the commutator etc in the back housing, I had unintentionally rotated the field coil assembly half a turn in the housing and reassembled the motor without noticing my index mark was missing! This created the same effect as if I had swapped the brush lead positions, and reversed the motor rotation. The motor capacitor is for brush arcing and RF suppression only.
Keep up the good work. Regards, Art
TECH TIP:
Common replacement screw sizes for motor assembly:
Motor bracket screw: M5 x 12mm long thread, flat head machine head screw. ( if too long it will hit internal parts of motor !)
Motor pulley screw: M4 x 8mm long thread, pan or cheese head screw. Include a washer here.
Motor pulley stop pin: .062" C.R.S. rod or music wire, must conform ( bend ) to inside of pulley.
I have found the local Industrial Ace hardware to have a good selection of metric fasteners.
Please have a look at these other pages of interest on my Unimat web site
DF 2026
Here is more technical information on Unimat motor design and problems.
Very interesting basic motor primer. Full explanation of Capacitor function.
Some of this information was gleaned from a Wood Worker Forum article that was addressing leaking capacitor and backwards rotation problem. It is credited to Gerhard from Santpoort-Zuid, Netherlands.
The Emco Unimat has a brush motor ( later motors ), not an induction motor.(earlier motors) The product name incorporates "universal", and mains powered brush motors were called "universal motor" in the 50'd ans 60's, since they could run on both AC and DC. The larger Emcos (Compact, Emcomat and Maximat series) all have AC-only induction motors. These would need a capacitor for the necessary phase shift in their auxiliary field coils. The value of the capacitor you mention, is a typical noise suppression capacitor belonging to brush motors, applied to minimise the brush sparks and thereby dampen reception disturbances of radio and tv sets. You also mention "brush housings", so your machine is indeed fitted with a brush motor. In the case of a series connected brush type motor, the capacitor has nothing to do with sense of rotation or with starting up. The construction of such a motor enables it to start all by itself, and always in the same direction. Only when the brush wires are switched or the position of the brushes are changed, will the motor run in the other direction.
So the sudden change of rotation is a bit of a mystery. As for the capacitor, it is indeed defective if it has spilled parts of its contents, and it has to be replaced.
The capacitor needn't necessarily be of the same make or size, more vital is the exact value and even more so the rated voltage. A value of 0.01 microFarad (or 10 nanoFarad) is quite small. Coffee bean grinder motors an cheap juice extractor motors already have 0.047 microFarad (or 47 nanoFarad) or more. But never mind, though, if it reads "0.01", than 0.01 it is. This type of capacitor is called a "wide band suppressor capacitor". It is active over a wide frequency range and can suppress static brush spark crackling from the FM radio bands all the up to VHF and part of UHF tv channels. The larger 0.01 part does most of the work; if it shortcircuits or fails in any other way, there is no chance of transmitting mains voltage to any metals parts of the machine and to the user, touching those parts. This low-risk part within the wide band capacitor is called the X-part. The two components with the value of 2500 picoFarad, are both connected to the metal mass of the motor (used as a sort of common "ground") and if these fail, they may transmit mains voltage to the motor metal and the user. The small wide band capacitor parts are categorised as Y to remind of that risk. Nowadays, most radio and tv receptions proceed through cable and are is many cases even digital. There is no more real need to use a full XY-cap for noise suppression. If you open nowadays' coffee grinders, kitchen mixers, weed trimmers, vacuum cleaners and other brush motor driven appliances, you see small blockshaped capacitors containing the safe X-part only. So in your case an X-type suppressing cap (the modern and higher voltage rated variety is called "X2") will also do fine. A good electronics shop will be able to supply you with a 0.01 microFarad X2-cap, with must preferably be capable to withstand 275 AC Volts but at least 250 Volts AC. The "self healing" polyester foil types are the best quality on the market, in Europe they are called "MKT" types. A few dollars (as little as one or two) may get you such a part, whereas versions with readymade wires instead of soldering pins, may be slightly more expensive. Polypropylene film "MKP" types will also do fine, as long as the voltage rating is at least 250 volts AC.
Since the X2-types have no ground connection lead and therefore don't need a third "ground" wire, there is only the need to attach the two remaining wires parallel to the motor itself. There are also brush motors that have their suppressing capacitor connected over the two brush holders. In that case the field coils also have a suppressing function ("inductances"). You will soon what kind of connection your brush motor uses, most likely the first. The cap needn't necessarily be housed within the motor itself, it may be connected anywhere between the switch and the motor. The cap must never be connected before the switch, there must always be the motor as a parallel load.
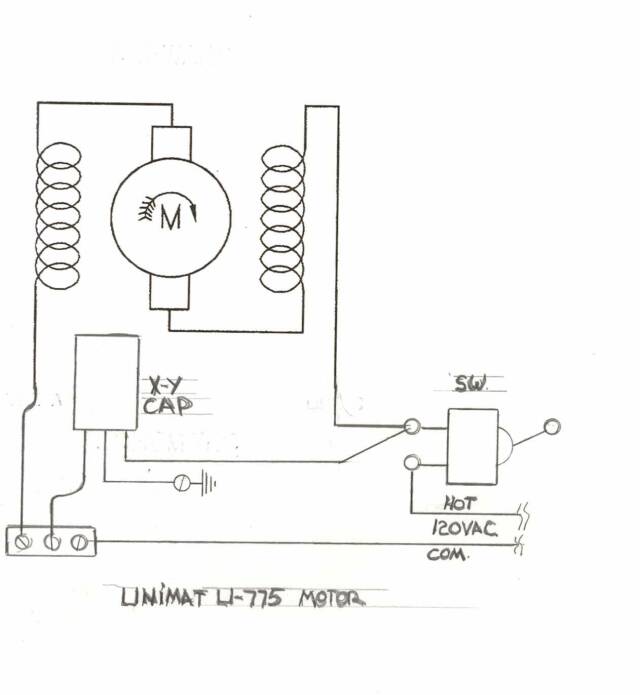
Pix shows wiring diagram and XY capacitor as used in the Unimat DB/Sl, U-775 motor.
Unimat DB/Sl U-100 motors use an X style capacitor across the brushes for suppression. As described in above article. A failed capacitor will not show itself. The motor may appear to run as normal. A failed suppression capacitor will lead to more radio and TV noise (interference ). Of more importance, a faulty capacitor will lead to accelerated wearing of brushes, arc-over and burning of the commutator.
To root out that creeping-in misunderstanding again: the 0.01 X-part is NOT used for starting or phase shifting through any auxiliary winding, brush motors do not need and feature such windings. The main duty for an X-cap is reverse voltage spike absorption , nothing more. These spikes are caused by the armature and field coils during commutating interruptions between the brushes and the commutator . The power consuming coils, operating in a magnetic field, also act as generating coils, and the reverse voltage is generated each time the fed power becomes zero for whatever reason. This effect is known as "counter-EMF" or "counter electric motor force". The high voltages and sudden current changes also cause the brush sparks. By absorbing the spikes and partly quenching the sparks, radio noise is suppressed by some deciBels. The active bandwidth in which the cap is active, has its center at approx. 1.3 MegaHertz, as is shown in the diagrams in the PDF-file. X-only caps have a much narrower bandwidth, but are deemed adequate nowadays because radio and tv receivers have either become more selective and disturbance-proof, or have gone digital.
The next article stresses the suppression function of the capacitor.
Unimat DB/SL and Unimat-3 motors run clockwise as you face the motor pulley. The spindle turns down towards the cutter.
The next article address why these motors may over heat.
In several sites i saw, that the very first Unimat had an induction motor as well, like the larger Emco versions. This i didn't know yet. The early Dutch hammerite painted motor with built-in fan is probably an induction motor as well. The semicylindrical shape bolted on to it, may house a combined starting en running capacitor for its auxiliary windings. The later Dutch two tone painted brush motor is obviously derived from a sewing machine motor. The 90 Watts input sounds about right for such a motor, it's typical for electric household sewing machines. Some other Unimat motors are based on this motor design as well. Cranked up to 300 Watts with hardly any size increase and without an internal fan, i can imagine the overheating problems that i read about.
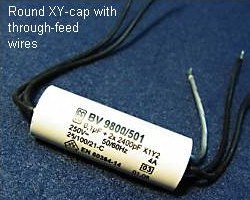
Wax type X capacitor As used in the U-100 motor
Pix credit , John Rawley
The earth connection is to the motor case.
Speed Control Question ( interesting e-mail )
Doug, You kindly sold me some belts and parts for my Unimat a while back, and your site as always is very informative.
Mine has the U-100 motor. I want to run it at very low speed to wind a few magnet coils, and the slowest belt speed is still way too fast for comfort. Do you know if anyone has used a simple 110v dimmer light switch to control the speed, and if this is recommended? (While I expect you would be happy to supply me a new motor, I would be even happier not to burn mine out!)
Regards, Frank
Hi Frank, ( reply e-mail )
Universal AC-DC motors like the Unimat motors are very robust and forgiving. ( the design has been around for 60 + years)
I have used dimmer controls years ago, they work OK, just remember, you will loose power at lower speeds.
The speed control that Emco used years ago was just the fore runner to the very compact dimmers we have now.
Also back in the day, early Unimat users were fond of using pedal style sewing machine speed controls. (slide wire rheostat) For their machines.
Same applies. If motor heats up, let it cool.
Hope this helps. Doug
Pix credit , John Rawley
Pix of Early DB 200 with Capacitor- Induction motor. These brushless motors have very high no load RPM.
Unimat DB/Sl and Unimat-3 motor wiring diagrams and comments
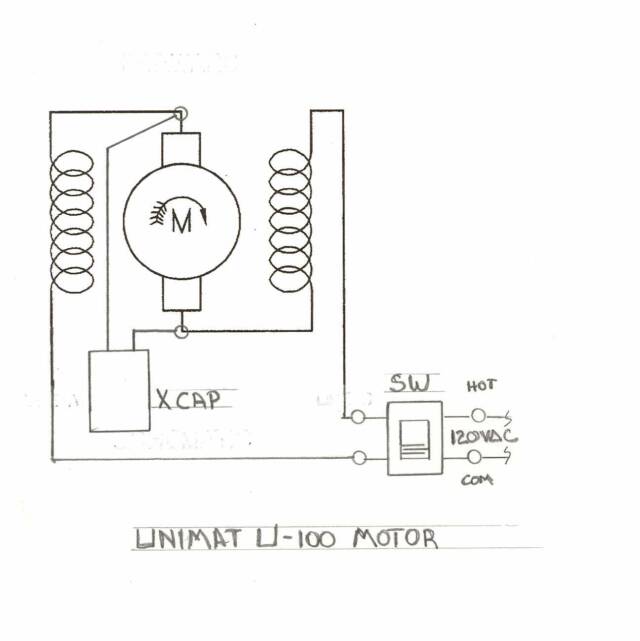
Unimat U-100 Motor
Unimat U-90 & U-7750 Motor
Unimat U-3 Motor
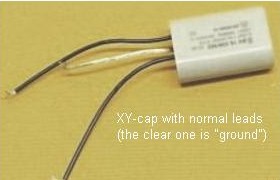
X -Y Feed Through capacitor.
As used in the U-3 motor
Pix credit , Gerhard
Pix credit , Gerhard
X -Y Capacitor.
As used in the U-7750motor

Unimat-3 Motor. It is a sophisticated design for a Universal Motor ( in it's day ), but executed in a straight forward manner.
Again a well made motor with large oilite bearings.
This motor is the most complicated internally.
If you are not experienced in servicing small motors. Stop here.
Remove front cover with thumb nail to access electrical components.
To service; First mark case where it splits, must go back same way. Remove pulley stop pin. Unscrew two through screws. Pry off brush caps, split case, remove motor shaft ( rotor ), watch orientation of internal washers. Tag and remove leads attached to brushes.
This motor has wiring in front and rear of case, careful.
I solvent flush all components and dry with compressed air.
For some reason the rocker switch on this motor can be a source of intermittent problems.
Again, solvent clean, dry and force lubricate switch.
While rotor is out , clean commutator with fine garnet paper, solvent clean and dry.
If you are not familiar with this procedure. Stop here. Seek help.
Again be sure everything is cleaned.Oil bearings with light oil then I lube shaft with Lubriplate (machinist lube, a light lithium / moly base grease ).
This motor is reassembled different from earlier motors. The brush assemblies are already in place, so both brushes need to be pulled back slightly and simultaneously to allow rear housing to fit up.
Put back together in reverse order. Electrically and mechanically.
For more motor information
See: My, Motor wiring diagrams and comments below.
Unimat-3 motor is the most sophisticated ( electrically ) of all the motors Unimat ( Emco ) used.
As seen in diagram below. It uses a three position rocker switch to provide. Off, Lo-speed and Hi-speed functions.
It utilizes a diode to provide half wave rectification for Lo-speed. A feed through type X-Y capacitor to work in tune ( literally, it becomes an ; inductance, resistance and capacitance tuned circuit ), with the inductance of the field coils to help filter and smooth out the choppy half cycle of the rectifier ( diode ). Also, they included ceramic capacitors at each motor brush connection to provide for arc suppression (reverse EMF).
My wiring diagrams below, should help visualize the function of the motor capacitor as described in articles above. This should aid in diagnosing motor problems.
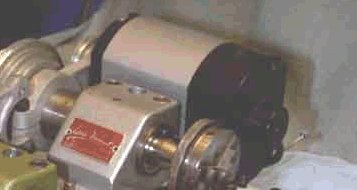
Dutch Treat Motor
Many thanks to John Lind. For provinding pix and info.of his early Black and Silver motor. Made in Holland by Motoren Eindhoven .
John is rebuilding his cast iron early DB.
There's an old adage that says: "If it ain't broke. don't fix it". In this case I had to open my motor to see what it looked like inside even though it ran well and didn't run hot. It was a mess with excessive grease, oil, carbon , you name it. What I also found was some interesting surprises in the bearing details. The bronze bearings appear to be porous and surrounded by a felt wick under a washer and a snap ring. note the radius on the outter bearing that fits in the black end cap.
Here's the disassembled motor. Note the commutator hasn't been touched yet. I'm still hoping to turn it and clean it up. I call the motor ( Dutch Treat ) because it would really be a treat for this original motor to continue to serve me through the life of this lathe? Fingers crossed. Note the brushes. I suspect replacements with no attention to the commutator.
Before Original condition and paint
After Internals cleaned up and sporting new Hammered paint
Certainly, a very well made motor
John is going to oil the bearings and felt wicks with light oil, like ( 3 in 1 ). After he turns the commutator true, the insulated spaces between commutator segments will be under-cut, slightly. This will allow the brushes to make full contact .
When cleaning the commutator. Use garnet paper ( sand paper ) not emery cloth , which is electrically conductive ( may cause short ).


Very long page, lots of good stuff!!
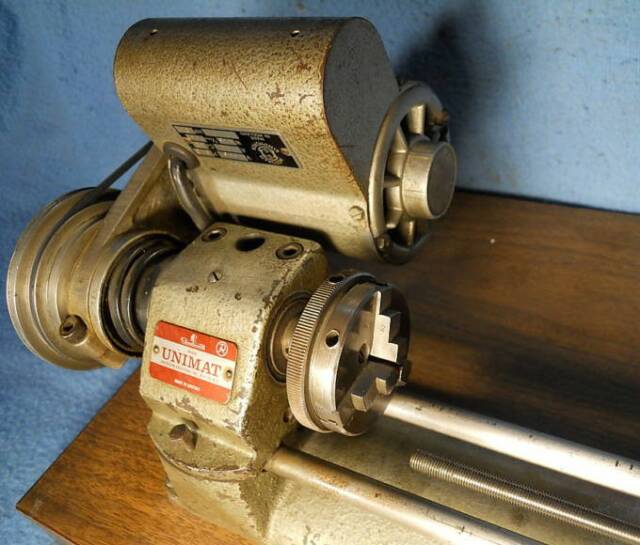
This is the motor John is describing.
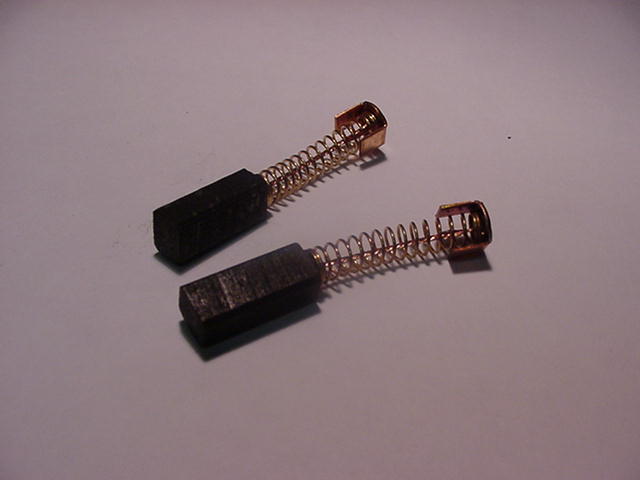
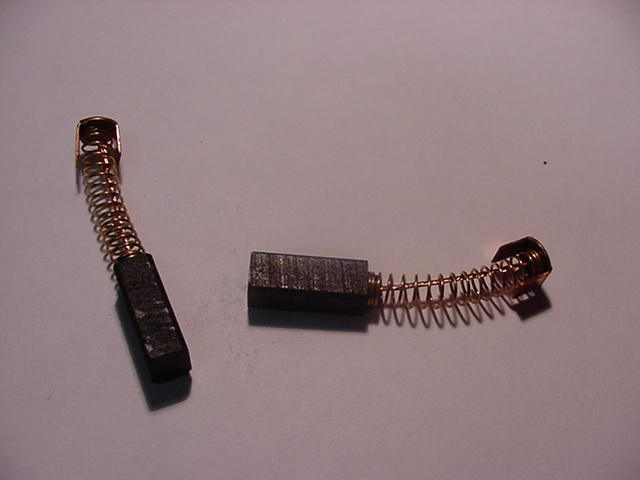
Replacement motor brushes available to fit;
Unimat DB/SL: U-90 Motor , U-7750 Motor and U-100 Motor
Unimat-3 Motor
$35.00 for set ( two brushes ) any of the above motors
email Doug for more info dfeistamel@comcast.net
U-90 motor brushes, now available.
See below or Order form
U-7750 motor brushes, now available.
See below or Order form
IN STOCK
U-100 motor brushes, now available.
See below or Order form
U-3 motor brushes, now available.
See below or Order form
Unimat-3 Motor Switch Problems
Received many emails over the years concerning U-3 motor switch problems. Seems they can become stiff, gunked-up or maybe one speed stopped working.
You might try, ( with unit unplugged ) flush switch with WD-40 then blow out with air. ( while working switch )
This has worked for others in the past.
Make your U-90 motor run like new. DIY
Ball bearing up-grade kit w/ instructions. $55.00
Drop-in replacement for OEM oilite bearings
Email Doug for info
dfeistamel@comcast.net