TECH TIPS PAGE
Practical, information for maintenance and operation of the Unimat DB/SL.
If you have technical advise you would like to share , let me know and I'll post it here...
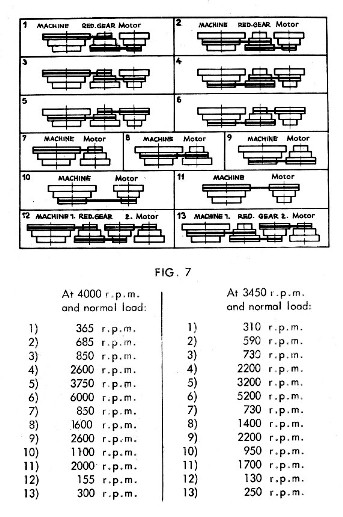
DB/SL SPINDLE SPEED CHART
* UNIMAT TECH TIPS PAGE *
Special attention should be paid to spindle bearing maintenance. As this is the key to accurate spindle run-out! Before you put your DB/Sl into service after purchase or storage, service the bearings. Keep in mind some of these units are 45 years old and grease hardens up. If your spindle bearing are noisy or worn and can not maintain run-out .0005" , replace them! I have purchased a stock of exact spindle replacement bearings For bearings, see my belts & accessories page
Maintenance section Unimat Manual
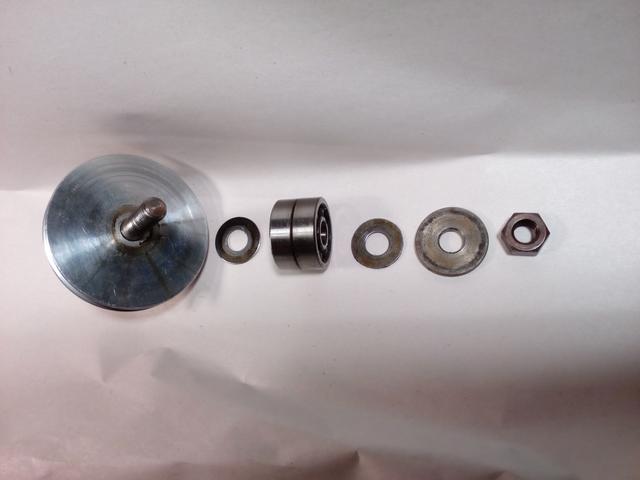
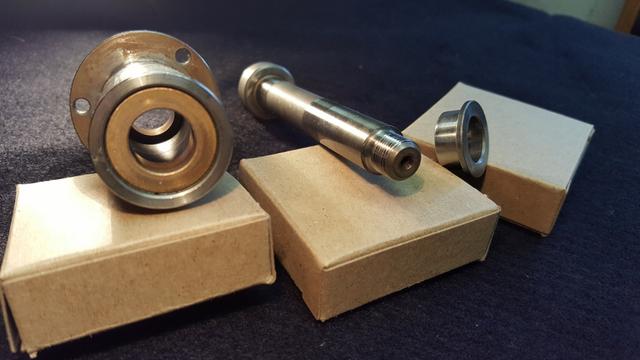
The spindle bearings are grease packed. To service, the spindle should be disassembled and the bearings regreased. To do this remove the spindle cartridge from the headstock and unscrew the nut retaing the step-pulley, holding the shaft and turning the nut counterclock-wise. If the nut is difficult to remove, apply penetrating oil. After slipping off the pulley, gently drive the spindle shaft out of the bearings from the rear, using a wooden mallet to avoid damaging the shaft's threads. Laying the parts out in order same side down as you remove them simplifies reassembling them later. Wash the parts one by one in solvent, wipe them clean with a lint-free rag, and regrease the ball bearings with a general purpose bearing grease. Since the bearings' brass ball retainers hold the balls rather loosely, be careful not to lose balls that might fall out.
The spindle cartridge is assembled much like a bicycle wheel hub. When reassembling it be sure to replace the dished washers, which preload the bearings slightly, in correct order. With the spindle assembled, tighten the pulley retaining nut all axial play is taken care of with proper preload washers. The spindle must spin freely in its bearings to run smoothly at high speed.
Bearings run in old dried grease, improper grease or no grease, can cause brinelling of the bearing race and or balls. Brinelling leads to noise. Once noisy no amount of lubrication can change this.
Here is a TECH TIP from:
Shane Hallsworth
Regina, Saskatchewan
Canada
I have a unimat (hammer green). Besides doing regular headstock maintenance I would also recommend that the tailstock be dismantled, cleaned and given a very light coat of grease. I also dismantle my 3 and 4 jaw chucks and clean any chips or dirt that may wedge in the threads.Without this maintenance your chucks will not close accurately and could wear out a lot faster.
TECH TIP:
Unimat Model # 736.21410. This Unimat is made by Emco, and private labled for sale by Sears Roebuck & Co, ( Sears part # ). It is the same as any Unimat SL ( just different tag).. You can use all of the belts, accessories & Manual for the Unimat DB/SL models.
TECH TIP:
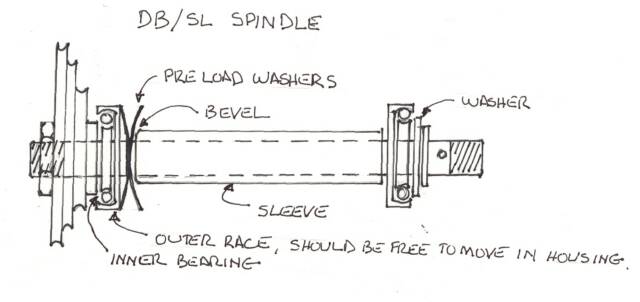
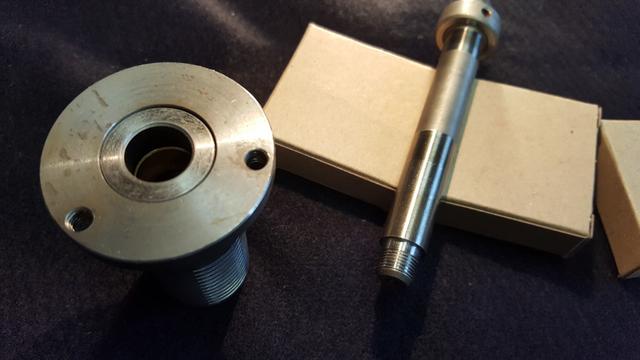
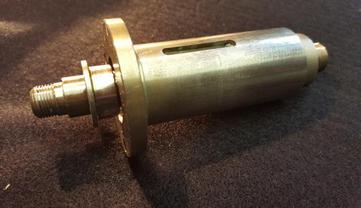
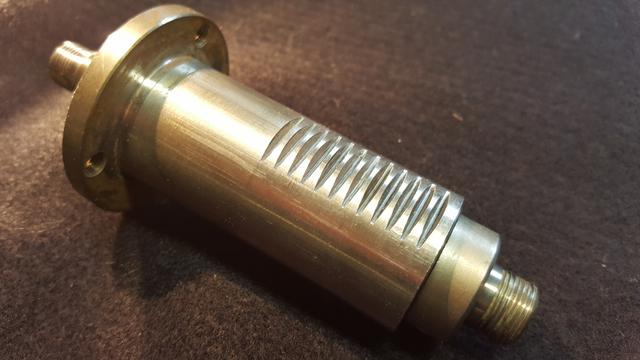
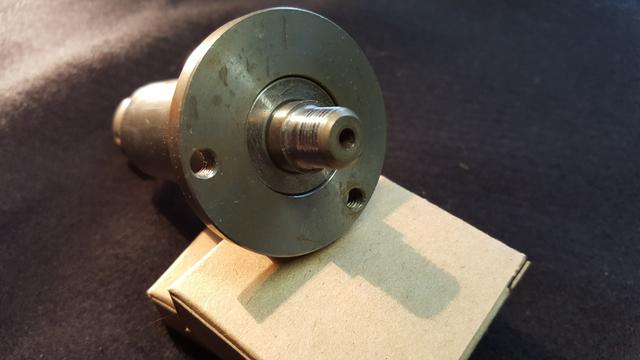
DB/Sl Spindle Bearing Installation Instructions:
Here is a copy of my spindle bearing instructions. This should help you in proper reassembly.
Preload Washers / Belleville - Disk Washers:
Something of interest from the manufactures specs.: When installed between two ball bearings, they assure perfect positioning of the bearings with no side play. They provide precise bearing preload and proper tension, extending the life of the bearing and eilmiating excessive noise.
Here is a TECH TIP from:
Eugene Saboda
Heres a little tip, maybe you know it already, when using the feed handle to move the spindle in the head stock, in the vertical position it's works OK, but in the horizontal position it has a clunky feeling to the feed handle. By dropping a small ball bearing ( about 1/4" ) in the feed handle hole first and then replacing the handle it will smooth out and give one a fine feed and feel to the handle.
DB/SL PULLEY SIZE INFORMATION
Here is the pulley size information
Measurements are outside diameters
UNIMAT DB/SL
Motor Pulley: 18 - 30 - 42 mm
Intermediate Pulley: 18 - 30 - 42 mm
Spindle Pulley: 65 - 75 - 85 mm
Here is a TECH TIP from:
Robert Frear
Here's an interesting discovery I made when taking apart an old dot-matrix printer for my parts bin. The print head carriage rod is the exact diameter of the Unimat DB and SL carriage rods! As the years go by, the carriage starts looking pretty rough, and these look like a high quality replacement.
Not only that, there are stepper motors, drive belts, and other things to
make prototype CNC etc.
I dismantled two printers, a narrow carriage Panasonic and a narrow carriage NEC. Both had the same diameter rod, and were of adequate length. The older the printer, the more robust it seems, and around here, they often sell for peanuts.
Unimat 3 Jaw and 4 Jaw Chucks
Chuck Notes / Replacement Chucks / Jaw Replacement
Over the years the jaws can take a beating, especially if abused by over tighting.
Original DB/Sl jaws are hard to come by.
The chuck jaws for the Unimat DB/Sl and The Unimat 3 were the same. ( the chuck spindle thread was different, 12 X 1 mm for DB/SL, 14 X 1 mm for U-3 ). The Unimat 3 is now the Taiwanese made Unimat 4, there are also Taiwanese knock-offs , the MJ189A and Combi-218.
Note: Unimat DB/SL spindle thread 12 x 1 mm
Unimat 3 / 4 spindle thread 14 x 1 mm
Also, keep in mind that Sherline makes replacement chucks with Unimat threads.
Unimat DB/SL 12x1 thread,
#1068 three jaw chuck and # 1071 four jaw chuck
Unimat-3 14x1 thread
#1031 three jaw chuck and #1035 four jaw chuck
Here is a TECH TIP from:
Richard Hall
" WW " Watch Makers Spindle Belts
The regular small belt fits from the motor pulley to the idler (this is no different from the normal spindle) and the power feed belt fits from the idler to the main spindle pulley. This main pulley is much smaller than the one on the regular spindle. For belts, See my belts & accessories page
DF 2026
 | ||||||
TECH TIP:
Redford Green
To clean the internal threads on chucks etc. on the Unimats I use a bronze shotgun cleaning brush.
12 bore is about right for the Unimat 3/4 and 410 for the DB/SL
TECH TIP:
Jude
A quick tip for anyone looking for some high-quality Tommy bars. Locate a couple of old 5 1/4" floppy disc drives (remember those?) and take them apart. The guide rail for the head is 3.70" long and .158" diameter and fits the holes in the 3-jaw chuck perfectly. If you work at a large company, ask your PC techs if they have any, or try a used computer store. They will probably give you a box full of drives just to get rid of them. As a bonus, the body is fairly good quality aluminum you could use for small projects.
Spindle Nut Removal:
Sometimes the spindle nut can refuse to come off, ( not a surprise, after 30 or 40 years of being locked in place ). In the process of holding back the shaft, the nose threads and or locking hole can be damaged.
Here is a proven way to loosen the nut and not damage the assembly.
Works for both standard spindle & "WW " spindle cartridge.
Soak the lock nut with WD-40 or the like for a couple of days, tap on the flats of the nut ( a piece of flat stock, brass ) Hold back on the pulley, it's the largest surface, covered with a piece of split vinyl tube. Use 19MM wrench , rap on wrench with mallet. It will give.
Here is a handy speed chart, for both the standard pulley drive and the slow speed or double reduction pulley drive.
The slow speed drive has two idler pulleys. It delivers twice the power at half the speed for turning large work or threading.
Note: the motor pulley is on the right of the chart. It can be removed and reversed on the motor shaft to deliver the speed indicated on chart.
The last two diagrams 12 & 13, show the slow speed drive ratios.
TECH TIP:
Richard Ashley
I have a small tip to pass on to you and other Unimat users. I use the diposable plastic cup shaped covers which protect the spring connectionsons on 6-volt lantern batterys when purchased, as a means of protecting the threads on both the headstock and tailstock spindles when not in use. The cone shape presses on nicely and stays put while not harminng the threads therefore protecting them from damage.
Spindle Removal:
The spindle can be removed as an assembly.
Loosen the two 5MM socket head screws on the head, remove the small slot head screw / pin, remove pinion lever.
Loosen clamp that holds the spindle to motor bracket. The spindle W/pulley & spring can now be removed from the back of head, away from tail stock.
If the pulley is turning you may hold back with the spindle lock hole to loosen nut, be careful not to distort hole.
Clean all parts with solvent and re lube.
Power Feed Belt:
Sometimes you will find the pulley of the Power Feed attachment does not align with the take off pulley on the spindle. No problem! Just advance the spindle with the quill lever and lock the spindle in place with the two clamping, socket head screws in spindle head. You will need this alignment when you cross the power feed belt to reverse the feed for left hand cuts, toward the tailstock...
Cutting Right / Cutting Left:
I know this is basic, but I will review it here for those not familiar and to help with any confusion....
Right hand cutting; Is the most common cut, it means you are cutting left towards the spindle!
Use right hand turning bit, tool would be identified with ' R ' example ( AR-4 ).
Left hand cutting; This means you are cutting right towards the tailstock!
Use left hand turning bit, tool would be identified with ' L ' example ( AL-4 ).
Good to know when ordering cutting tools or grinding your own cutters!
TECH TIP:
Danny Bynum
Really enjoy your website.
Thought this tidbit might be of interest to other UNIMAT users:
I’m always on the lookout for a nice (and cheap) source of shim material for my tool post. I recently discovered
stock that measures .026 thick and is .312 (5/16) wide made of mild steel. This just happens to be the depth of
my UNIMAT 3 tool holder slot.
If you’ve ever worked in an office then you’ve probably heard of a hanging file folder called “PENDAFLEX” or “FILE-PRO”. Well, the metal strips that support the heavy paper folder are made of this material. Usually 13” long for letter size. Ask around and you can probably get one for free…….You only need one.
I used a small metal shear at work to clip off shim strips about 1.25 inches (32mm) long. The shear left a nice square, but sharp edge that needs to be rounded off a bit. You might be able to use a Dremel cut off blade for the cuts. I’m sure there are a few different ways to make a nice cut.
( This should work equally as well for the DB/SL tool holder, Doug )
Casting Changes
The changes in castings, as you may or may not know are documented on other sites. I was never that interested in subtle production changes. I find more fun in using my machines.
There is a lot of verbiage out there about which machines are better. The verbiage I find interesting, is that the cast iron base machine is stronger ( better ). What should be noted, is that the inherent weakness of the DB/SL design, is its use of rod ways, which can distort under heavy load. The question of which base is stronger is moot.
That understood, within it's limitations it is a precision little machine. All cast parts are interchangeable and adequate.
Although I believe there are very slight center height differences ( .0015" / .0005" , headstock to tailstock ) 'tolerance', between the different production sequences.
Note on intechangabilty: Factory information. Each Unimat headstock was line bored with tailstock during manufacture. Probably accounts for center height differences between different units and or inter-changed parts.
Adjusting tool bit height ( here is an answer to a recent email )
(Again, I know this is basic, but I will review it here for those not familiar and to help with any confusion....)
I have got another question, I lock the spindle head down tight but if I try to cut to the center of a part on the lathe. The part climbs up over the tool and twists the head. How do I stop this from happening? Kurt
Suggestions:
The tool bit cutting edge height has to be dead on center of the work.
An easy way to check this, hold a piece of thin stock or ( machinist 6" rule ) next to round work and run cutter up to it with cross slide. If rule stays straight, you are OK. If rule turns back or forward, you need to adjust the cutter height with shims until rule stays straight.
The end of the work is moving, because it is not supported. You need to center drill from tail stock and then support end with live or dead center, Use a steady rest, Make sure tools are sharp. When cutting steel, go easy. Doug
Tech Tips is a work in progress
Thank You, to the many Unimat enthuisasts from around the globe for your help!......
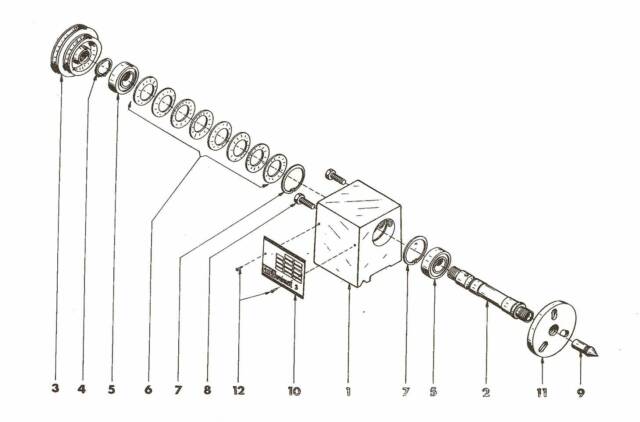
Remove and clean all parts:
A solvent base cleaner is good. A citrus base cleaner is OK, just be sure to completely dry parts after rinsing.
Lube bearings with a medium bearing grease.
I would not use lithium (white) base grease or Lubriplate as they do not hold up at high speeds.
I use Super Lube synthetic grease w/ PTFE.
Now reassemble.
NOTES:
1. Use bearing as packaged. Do not interchange parts. If a ball is loose, hold in place with a dab of grease for assembly. Do not modify ball cage.
2. 1st bearing (pulley end) should be free to move in housing.
2nd bearing (nose end) outer race can sometimes be difficult to remove from spindle cartridge.
3. The pulley compresses the preload washers thru the first bearing.
The sleeve transfers preload to second bearing.
4. Use chip board “cereal box” shims to space motor bracket off of pulley, slight misalignment with idler pulley is OK. Tighten lock bolt and remove shims.
5. Snug down pulley nut tight. All axial play is taken care of with proper preload washers.
Remove spindle head from lathe bed.
Remove & clean internal parts and housing.
A solvent base cleaner is good. A citrus base cleaner is OK, just be sure to completely dry parts after rinsing.
The Unimat-3 spindle although the same in principal, varies in execution from the DB/Sl spindle.
It uses a series of eight preload washers to load the bearings in a parallel/ series stack (this arrangement gives significant linear force on the bearings within a very short dimension ). Make note of which way each disc faces, must be reinstalled same way. When assembled the washers preload the pulley side bearing, which is locked to the shaft by C' ring. This pulling of the shaft transfers preload to the nose side bearing.
The bearings are permanent sealed and lubricated radial ball bearings. Bearings run in old dried grease, improper grease or no grease, can cause brinelling of the bearing race and or balls. Brinelling leads to noise. Once noisy no amount of lubrication can change this.
The bearings can be removed and replaced.
Disassembly.
Un-screw pulley, remove Motor bracket bolts, remove pulley circlip ( C' ring ). Shaft is now free to be driven forward towards nose.
The shaft needs to be protected. Use hard wood dowel or the like. Support / protect housing.
Bearings can be pushed out of head with dowel. They need to be driven out straight or they will bind and gall housing. Tail bearing will come out easy, it is a semi-slip fit. Nose bearing will probably come out with shaft. You can press it off ounce out.
Reassembly.
Replace nose bearing on shaft. Press nose bearing w/ shaft in housing. Assemble preload washers as removed ( see Note below ). Install tail bearing. With circlip on tool and close to groove, with one hand push bearing and compress washers while using tool to push and place circlip in groove with other hand.
Now install motor bracket & bolts and pulley.
Note: Pre-Load washers. Install new washers or clean and resue old. There are eight pre-load washers. Assembled in stacks of two. Two facing back, two facing front, two facing back, two facing front. See Diagram of; ' Various Confiurations of Belleville Washers '. Preload Washer , Tech Tip, above.
Note: To install Power Feed Belt. Spindle pulley must be removed (un-screwed)
Unimat-3 spindle and Mill head service updated March 2019
Tommy Bar
The three jaw chuck uses two " Tommy bars " to open and close the chuck. They are nothing more than 5/32" ( or 4mm ) diameter rods about 2 1/2" long.
Two 5/32" ( or 4mm ) drive pin punch, will work fine.
For the four jaw chuck, there were two different keys, one was a 7/32" hex or Allen key the other was 5/32" ( or 4mm ) square key.
A short piece ( 3" long ) of 5/32" ( or 4mm ) square stock ( key way stock ) bent L' shape will work.
A local hardware store should have these items.
Paint & Cleaning
When taking apart these old machines for rebuilding or servicing. Take care to protect the paint finish.
Do not clean the finish with harsh solvents or citrus base cleaners. They will harm or remove the paint.
A mild dishwashing soap, warm water and thorough drying works.
Protect finish with a coat of automotive wax.
I am not aware of any matching Hammered finish paint.
Illinois Bronze Paint Works was the oldest US maker of Hammered paint finishes. They were bought years ago by Sherwin Williams Co.. Offered now as Krylon. They have limited selection of colors. Hammer Green, seems too bright or glitzy. Although their Hammered Black, Hammered Gray and Hammered Silver would work on the early cast iron machines.
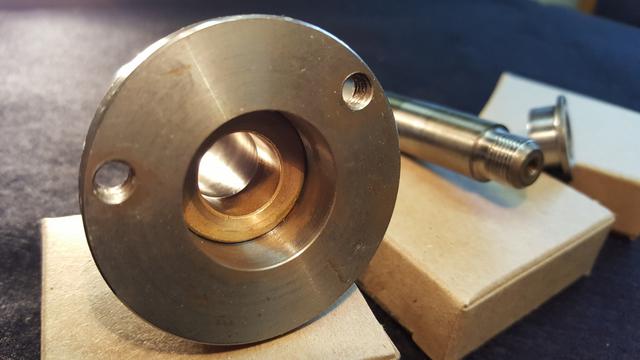
This illustration is to show how the parts go together. The sleeve passes thru the pre-load washers. If you have a very early cast iron machine. There maybe differences. Sleeve may not have bevel, shaft nose may not have washer but, machined shoulder. You may need to dress up the shaft at bearing bore ( ever so slightly ) to ensure reassembly! These bearings are two piece. Always keep inner and outer races of same bearing together, facing same orientation.
Stubborn bearing! See Eric Bunn's Tech Tip, below..
Here is a TECH TIP from:
Eric Bunn
After soaking my spindle nut in progressively stronger penetrating oils and some serious hammering, it still wouldn't budge. By placing the assembly in the freezer for a few hours, I was able to tap it loose easily. Apparently the thermo contraction solved the problem.
Also, other users have used a heat gun with sucsess. Thermal expansion / contraction.
Same can be applied to stubborn bearings.
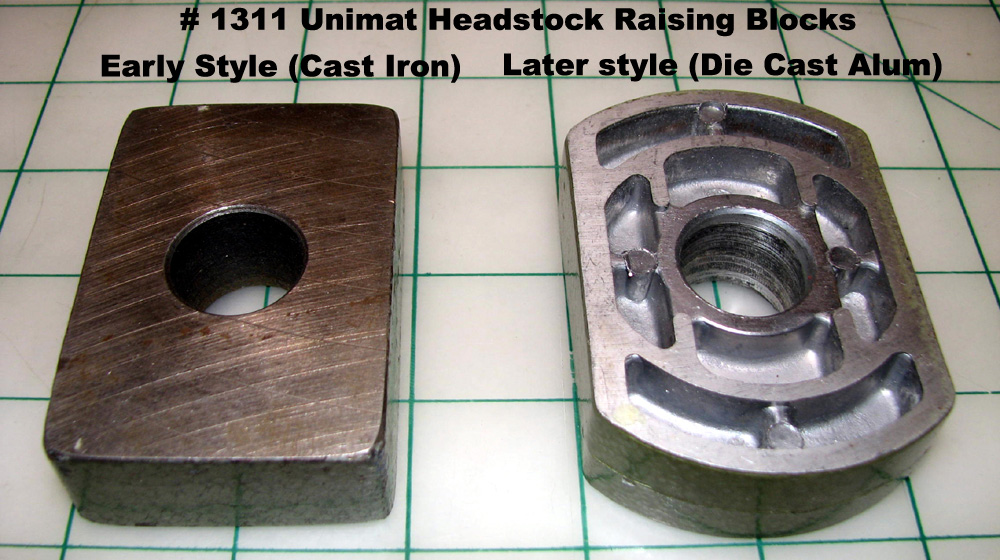
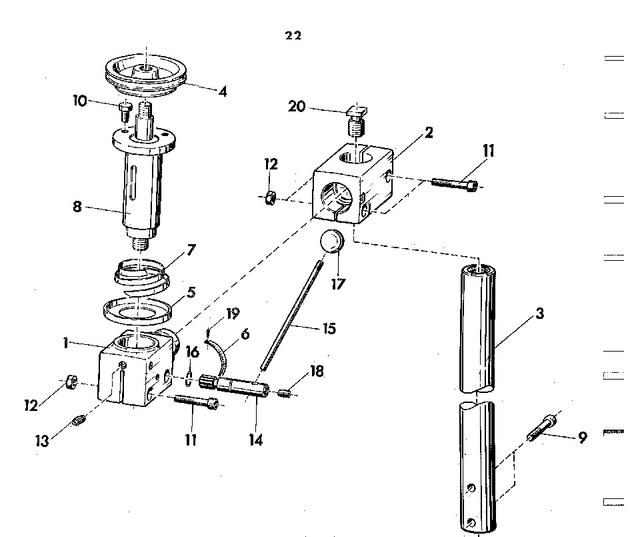
Riser Block ( an answer to a recent e-mail )
I do not believe the riser block was offered for the early - cast iron machines.
Emco offered an alloy Headstock rising block #1311, to be used in conjunction with the vise to raise the tool holder for the later alloy machines.. ( DB-200 through the SL1000 )
It was John Campbell of Campbell Tools an early Unimat enthusiast and dealer ( he has long passed and Campbell offers very little for the Unimat now ) that made and sold the first after market riser block set for the spindle, tool holder and tailstock. He also made and sold the first threaded drill chuck adapter.
Some of the block sets you see around today are his.
This Spindle speed chart is for reference only. Speeds are approximate. There are just too many variables effecting the final output. It seems each motor Emco used ( U-90, U-100, U-775, early Dutch motor, and induction motor ) have different no-load and load RPM characteristics. Then factor in the condition of motor and lathe. Well, you see where this is going!
Shipping the Unimat ( something to be aware of )
Each year I receive a number of emails from users who have a bent motor bracket and or damaged hand wheels and need replacements.
The lead screw is made of mild steel, when hand wheels are knocked in transit, the end of screw is bent causing the wheel to wobble.
More damage is caused in transit to the Unimat than any other situation.
The factory shipped these machines disassembled.
The motor, motor bracket, tailstock, and handles were all in their own wrapping. This prevented these parts from damage.
If you are purchasing a machine, request that the seller remove and pack these items separately.
It will save a lot of grief later.
Riser Block Update September 2011
A recent email from Art Bell ( Yahoo Unimat group moderator ) .
Who took the time to provided this detailed information with pictures.
Thank you, Art..
Hi Doug
In a recent look thru of your site to refresh my memory of your many Unimat related tips, I noticed the “Riser Block” heading.
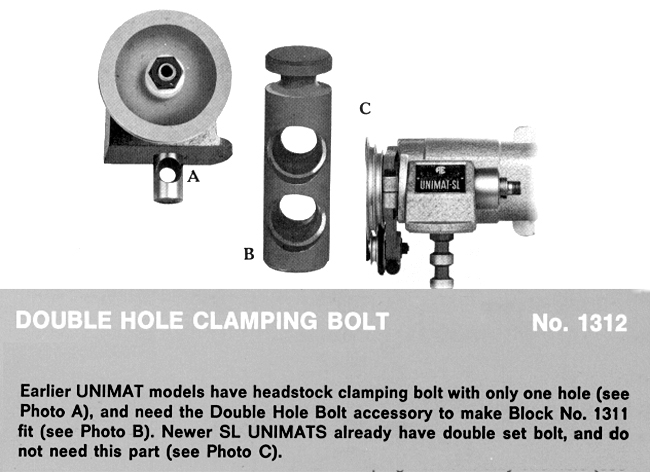
Just to keep the record straight, there WAS a cast iron riser block issued to deal with the change to the newer style circular saw and larger diameter saw blade available for it. (Photo attached showing both styles.)
The fact that there was never a riser for the tool post and/or the tailstock would indicate that it was never intended to be used to increase turning capacity.
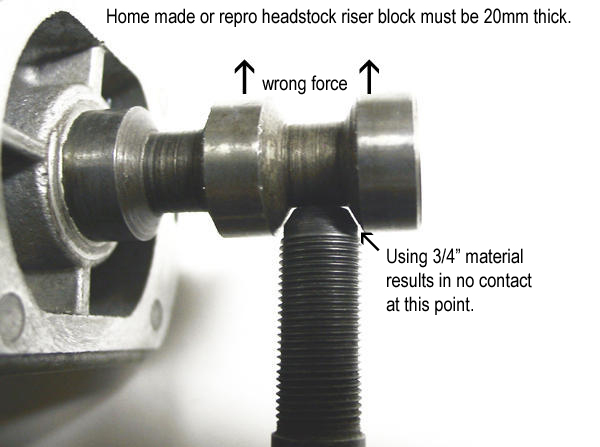
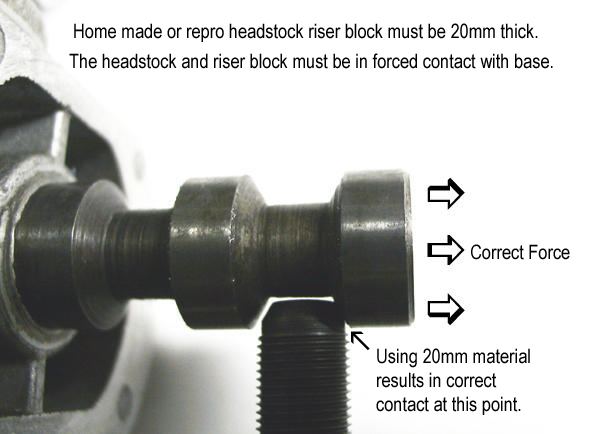
However being as it has been more popular for that purpose it should be noted that those who opt to make their own (and some available as repro’s) tend to try and get by with more common ¾” stock, when the originals
were 20mm thick. This slightly thinner material changes the headstock clamping geometry (as shown in the attached photos) by removing the intended down force required to firmly clamp the headstock (and riser)
against it’s base, thus eliminating any chance of poor work piece finish due to vibration.
As a side note, the very early Unimats required a #1312 accessory double hole clamping bolt to use the riser block. (Photo attached)
Please keep up the good work. Regards, Art
Please have a look at these other pages of interest on my Unimat web site
Long Page, Good Stuff!
Unimat-3 Spindle Bearing Kit in stock $35 . Order Form
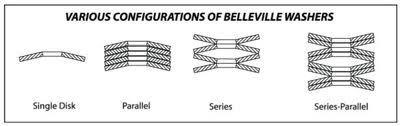
Unimat DB/SL machines use; two disk washers in series arangment.
Unimat-3 machines use; eight disk washers in series-parallel arrangement.
Unimat collets:
The Unimat collet holder was for the E-16 collets which are obsolete.
Available collets are ER-16 collets. They do fit sort of, ( different profile ) but are not correct for the Unimat DB/SL & Unimat-3 collet holder.
Check-out this link.
If you need the holder check-out this link. Unimat DB/SL has M12X1 nose thread , Unimat-3 has M14X1 nose thread.
Idler Pulley bearing assembly:
Lately I've had a few requests for assembly of idler bearings and washer / spacers. Probably should have done this earlier. Align pulley with motor pulley before locking in place.
Same assembly as slow speed idler pulley.
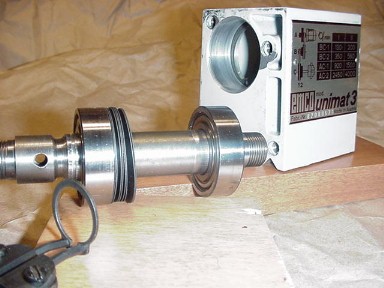
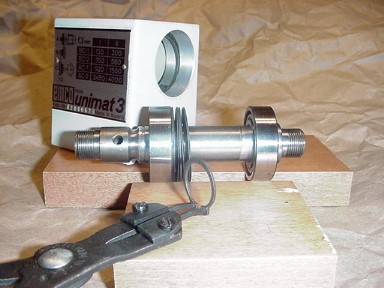
Unimat-3 Mill Head Bearing Service Instructions:
Many requests for U-3 Mill Head service info. Finally had time to put it up.
Unimat-3 Spindle Bearing Installation Instructions:
Many requests for U-3 spindle service info. Finally had time to put it up.
Pix of my Unimat-3 Mill head cartridge removed for service.
As you can see it is very basic.
Cartridge consists of two pressed-in bronze bearings, thrust collar and spindle quill
Remove and clean internal parts
A solvent based cleaner is good, citrus cleaner is OK. Be sure to dry parts after rinsing
Thrust collar is released by pressing spindle down from top and removing from bottom.
You will need an arbor press and brass scraps to protect threaded ends
I used long sockets as arbor bushings
I will re-lube with medium bearing grease NLGI #2 like Valvoline General purpose
Re-assemble as removed
All important here is setting thrust collar axial play of .003" - .004"
Too tight and quill will drag and over heat, too loose and quill will be sloppy